Introduction to Maytag Agitator Removal
Removing the agitator from a Maytag washing machine is a common step in washer maintenance. Whether you want to fix a broken part or replace worn agitator dogs, knowing how to disassemble the agitator is crucial. The agitator is the central piece that moves clothes during the wash cycle in many top load washers.
Before you start, always power off washing machine and unplug it from the wall. This safety step prevents electric shock or damage. Also, check your specific Maytag washing machine model numbers and read the manual for model-specific details.
For a deeper understanding of this mechanic, analyzing resources on How to take out the agitator in your Maytag centennial washer – YouTube provides excellent foundational context.
Tools Needed for Agitator Removal
To remove the agitator bolt and disassemble the agitator, you will need a few simple tools. These include a socket wrench to remove the bolt, a flat-head screwdriver to pry off the agitator cap. And pliers for any clips or stubborn parts. Some models benefit from an agitator removal tool to ease the process.
Having the correct tools helps prevent damage to the washer parts. Use a repair manual if you need guidance on the exact bolt size and location. Remember, the agitator bolt is usually hidden under the agitator cap in the center of the agitator base.
Using the right tools speeds up the repair and keeps the washer in good shape for longer.
Step-by-Step Guide to Remove the Agitator
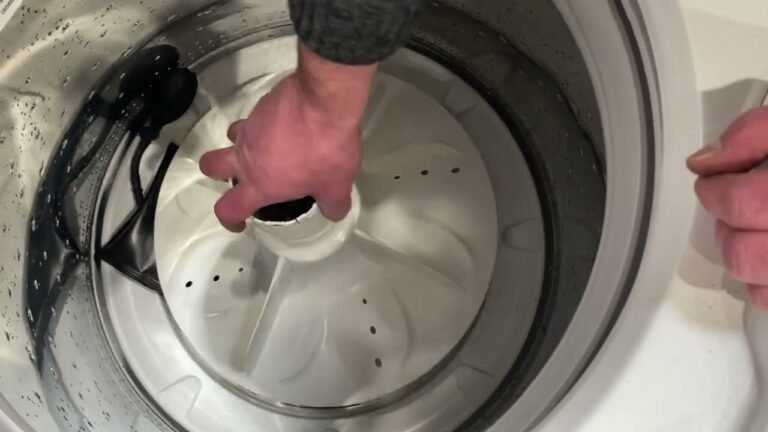
Removing the agitator from a Maytag top load washer follows a simple process. First, make sure the washer is unplugged. Then, open the washer lid and locate the agitator cap at the top of the agitator.
Use a flat-head screwdriver to gently pry off the agitator cap. Underneath, you will find the agitator bolt. Use a socket wrench to loosen and remove the bolt. After the bolt is out, you can lift the agitator off the washer drum. If it is stuck, try rocking it gently or use an agitator removal tool.
📌 Step-by-Step Guide
- Power off washing machine and unplug the power cord.
- Open the washer lid and locate the agitator cap.
- Use a screwdriver to pry off the agitator cap.
- Use a socket wrench to remove the agitator bolt.
- Lift the agitator straight up to remove it.
- If stuck, use an agitator removal tool or gently tap the base.
Removing the agitator allows you to check parts like the agitator dogs or bearings. Replace worn parts to fix washing machine agitator issues and improve wash performance.
Key Maytag Agitator Parts to Know
The agitator consists of several parts. The agitator cap covers the bolt and seals the top. Inside are agitator dogs, small plastic pieces that allow the agitator to spin in one direction. The agitator shaft connects to the washer motor to provide motion.
When you disassemble the agitator, inspect the agitator dogs and the washer agitator bearing for wear. Replacing these parts can stop noisy or non-spinning agitators. Using genuine Maytag agitator parts ensures a good fit and long life.
Check the washer agitator screws and bolts for tightness during reassembly to avoid future issues.
Basic Washer Maintenance Steps
Regular washer maintenance keeps your Maytag machine running smoothly. Check the agitator for debris or buildup, clean inside the agitator base. And inspect for loose screws.

Also, clean the washer drum and detergent dispenser regularly. These steps help prevent odors and wear. For model-specific tips, always refer to your Maytag washer repair manual.
Following washer maintenance steps can extend the life of your washing machine and improve cleaning results. For example, knowing how to wash a leather jacket in a washing machine safely also depends on a well-maintained washer.
Troubleshooting Agitator Removal Issues
Sometimes the agitator may be stuck and hard to remove. This happens when the retaining bolt is tight or if debris holds the agitator in place. Use an agitator removal tool for extra leverage without breaking parts.
If the agitator bolt location is hard to reach, remove the agitator cap carefully to avoid damage. A little WD-40 can help loosen rusty bolts. Always ensure the power is off before applying any liquids or tools.
In cases where the agitator base or shaft is damaged, consider replacing the entire agitator assembly with new parts.
Finding Maytag Washer Replacement Parts
Genuine Maytag agitator parts are available from appliance parts stores or online retailers. Use your washer model number to find correct parts like agitator dogs, caps, or bolts.
Replacing worn parts can fix many washing machine problems without buying a new washer. Properly installed parts will restore agitator function and reduce repair calls.
🆚 Maytag Agitator Parts Comparison
| Part | Function | Signs of Wear | Replacement Tip |
|---|---|---|---|
| Agitator Cap | Covers bolt, seals top | Cracks, loose fit | Replace with exact model match |
| Agitator Dogs | Allow one-way spin | Slipping, noise | Replace all dogs at once |
| Agitator Bolt | Secures agitator | Rust, stripped threads | Use correct socket size |
| Agitator Shaft | Connects to motor | Bent or worn shaft | Full agitator replacement advised |
For detailed part guides, the official Maytag website and repair manuals are best sources. These manuals give exact part numbers and detailed diagrams.
Conclusion
Removing the agitator from your Maytag washing machine is a straightforward task when you follow the right steps. Always start by unplugging the washer and using the proper tools like a socket wrench and screwdriver. Removing the agitator cap reveals the agitator bolt. This you loosen to lift off the agitator.
Inspect key agitator parts like agitator dogs and bearings. Replace worn parts to restore washer function. Regular washer maintenance, including cleaning and checking screws, helps avoid future issues. Reference your specific Maytag washer model number and repair manual for best results.
For safe and effective washer care, combine these agitator removal tips with broader washer maintenance knowledge. Learn more about related washer topics such as can bed bugs survive in washing machine to keep your laundry fresh and clean.
⭐ Expert Insight
Industry consensus indicates that regular agitator inspection and timely replacement of small parts like agitator dogs extend washing machine life by years. Avoid forcing parts. use proper tools and manuals to prevent costly damage.
Frequently Asked Questions
What tools do I need to remove a Maytag washing machine agitator?
You will need a socket wrench, screwdriver, pliers, and an agitator removal tool if the agitator is stuck.
How do I find the agitator bolt location on a Maytag washer?
Remove the agitator cap to access the bolt. The bolt usually sits at the center of the agitator base.
Can I remove the agitator without unplugging the washing machine?
No. Always power off and unplug your washing machine before starting to avoid any electric shock.
What if the agitator is stuck and won’t come off?
Use a dedicated agitator removal tool or gently tap the agitator base to loosen it before pulling it up.
Where can I find the Maytag washer repair manual for agitator removal?
You can find repair manuals on the official Maytag website or through trusted appliance repair resources online.

Michael Peterson is a home appliance writer focused on practical washing machine care, maintenance, and troubleshooting. He shares simple, reliable tips to help readers keep their washing machines running efficiently, avoid common problems, and extend appliance life.